Since Particle started shipping new Particle Mesh hardware, I’ve been spending a lot of time exploring the new devices, Mesh networking, and the new world of add-ons that our Feather-compatible form-factor unlocks. In this post, I’ll share how you can use Particle Mesh devices with the Adafruit CRICKIT robotics platform.
I’ve written in the past about how the new Feather footprint on Particle Mesh devices opens up a world of plug-and-play capabilities with the rest of the Adafruit Feather ecosystem. With over 50 FeatherWings to choose from, there are a ton of options for your next project.
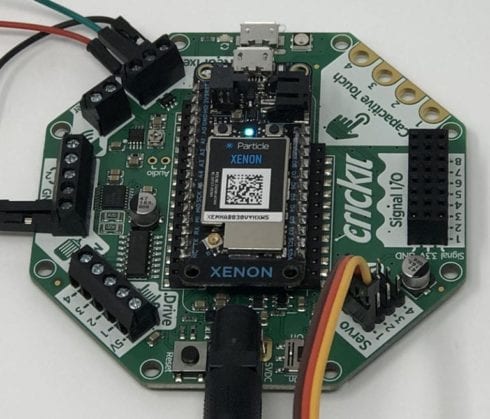
One FeatherWing that I’ve been playing with lately is the Adafruit CRICKIT FeatherWing. It’s a powerful, octagonal board that you can use to, as Adafruit likes to say, #MakeRobotFriend.
What is Adafruit CRICKIT?
CRICKIT stands for Creative Robotics & Interactive Construction Kit. It’s a low-cost, powerful robotics platform inspired by the original Cricket robotics platform from MIT, but with an Adafruit twist.
The CRICKIT Platform is available in four flavors:
- CRICKIT for Circuit Playground Express
- CRICKIT for Feather
- CRICKIT for micro:bit
- CRICKIT HAT for Raspberry Pi
Each variation contains a powerful ATSAMD21 co-processor that allows you to build a pretty full-featured robot (and it doesn’t have to be one on wheels, either!) using one or more of the onboard connections, including:
- 4 x Analog or Digital Servo control, with precision 16-bit timers
- 2 x Bi-directional brushed DC motor control
- 4 x High current “Darlington” 500mA drive outputs with kick-back diode protection
- 4 x Capacitive touch sensors with alligator-pads
- 8 x Signal pins, digital in/out or analog inputs
- 1 x NeoPixel driver with a 5V level shifter
- 1 x Class D, 4-8 ohm speaker, 3W-max audio amplifier
For my first set of experiments, I decided to play with a DC Motor, Servo, Neopixels, and the Capacitive Touch sensors. Read on to learn how you can use CRICKIT with Particle’s new Mesh hardware.
Using the Particle Xenon with the Adafruit CRICKIT
Since all three new Particle Mesh devices–the Argon, Boron, and Xenon–are Adafruit Feather-compatible, you can use any device with the CRICKIT platform. The device just pops right in, and since our devices are pin-compatible, it will work as any other Feather microcontroller would. On the firmware side, nearly every popular Adafruit device with a library is supported on the Particle platform, so you should have no trouble jumping in with FeatherWing displays, sensors, and more.

Installing the seesaw library
The CRICKIT platform is powered by seesaw, I2C bridge firmware that allows you to use just two data pins from you main microcontroller to control a lot of inputs and outputs on the CRICKIT board. The onboard ATSAMD21 co-processor handles the nitty gritty via simple, intuitive seesaw library commands.
The seesaw library is open source, so I was able to fork and port the library to add Particle Mesh support with very little effort. You can add it to your own Particle projects from the Web IDE, CLI or Particle Workbench by searching for “Adafruit_Seesaw.” Then, you can add the CRICKIT header include and object declaration to the top of your project.
- #include “Adafruit_Crickit.h”
- Adafruit_Crickit crickit;
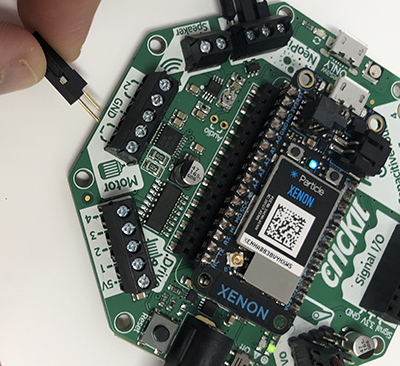
Working with DC Motors
The CRICKIT platform supports two DC motors. I connected mine to the side labeled #1 and used the screw terminals to secure the wires in place.
seesaw_motor header file:
- #include “seesaw_motor.h”
Then, just after my crickit object declaration earlier, I created a new instance of a seesaw_Motor object and passed it a reference to my crickit object:
- seesaw_Motor motor(&crickit);
Next, I needed to do a bit of initialization to the CRICKIT board any my motor, so I added the following to the setup function in my app:
- crickit.begin();
- motor.attach(CRICKIT_MOTOR_A1, CRICKIT_MOTOR_A2);
Because this is a Particle-powered CRICKIT demo, I can also include some Particle goodness, namely Device Cloud functions. I added two functions to start and stop my motor in the setup function:
- Particle.function(“startMotor”, startMotor);
- Particle.function(“stopMotor”, stopMotor);
And implemented those functions elsewhere in my app:
- int startMotor(String args)
- {
- motor.throttle(.7);
- return 1;
- }
- int stopMotor(String args)
- {
- motor.throttle(0);
- return 1;
- }
motor.throttle is a Seesaw function that takes a number between -1 and 1 to turn the motor forwards or backwards at increasing speed. Passing in a value of 0 turns the motor off.
I wrote my code in the Particle Web IDE, so all I need to do in order to run this demo is select my device, OTA flash it, head over to the Console or open the Particle mobile app and toggle the startServo cloud function.