I have countless fond memories of building and creating LEGO® sets as a kid. Those simple bricks gave me creative freedom to make what I wanted and not be afraid to fail. Now as an engineering student, I’ve grown apart from the toys that played such a major part in my development as both an academic and a person. Through years of exams and school projects, I’ve developed a fear of failure, and a hesitation to pursue my craziest ideas.
When building with bricks, I didn’t stop myself before trying something that may have seemed absurd, I just went for it. Interning at SparkFun has made me realize how important that freedom is and how much I’ve missed it. If I’ve learned anything from my time here, it is that you shouldn’t be afraid to embrace who you are and to try something different, no matter how crazy it may sound. It is this philosophy that inspired me to make something I was passionate about using some SparkFun components, a drill and some LEGO® bricks.
First of all, I’m a huge Star Wars® fan so you can probably guess what kind of set I picked out as the base of my project – a speeder belonging to a certain scruffy-looking nerf herder by the name of Han Solo caught my eye.
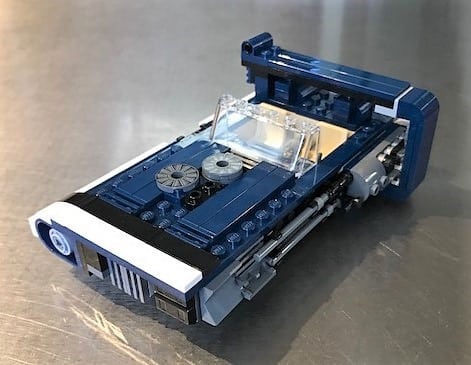
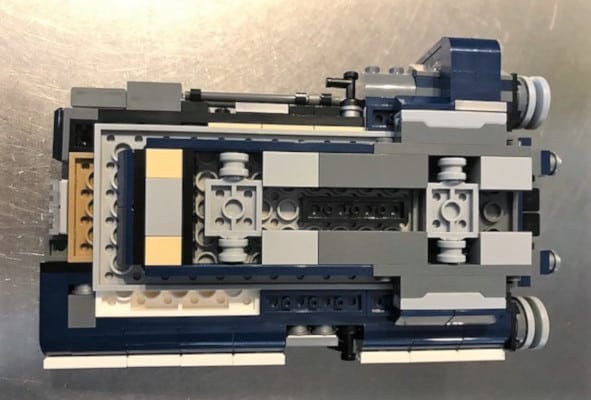
This is what the completed set looks like. Seem familiar? Han Solo used this same vehicle to escape Lady Proxima before leaving Corellia in Solo: A Star Wars Story™. The opening scene shows Han hot-wiring this speeder and the boosters flickering to life. The suspense and the imperfection in the speeder struggling to ignite was an effect I wanted to replicate as I set out to modify this vehicle.
But before I got too far, I needed to understand the infrastructure of the set. While assembling the speeder I focused on understanding the methodology behind the design. I wanted to know what parts were vital and if any bricks could be removed to make room for some electronics. The next step was determining how I could give the final design more life. I wanted to transform the speeder into something more dynamic and realistic.
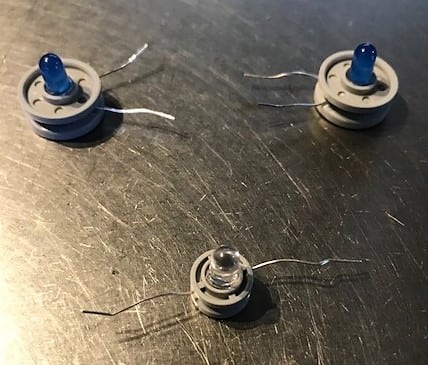
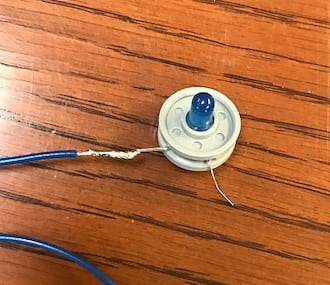
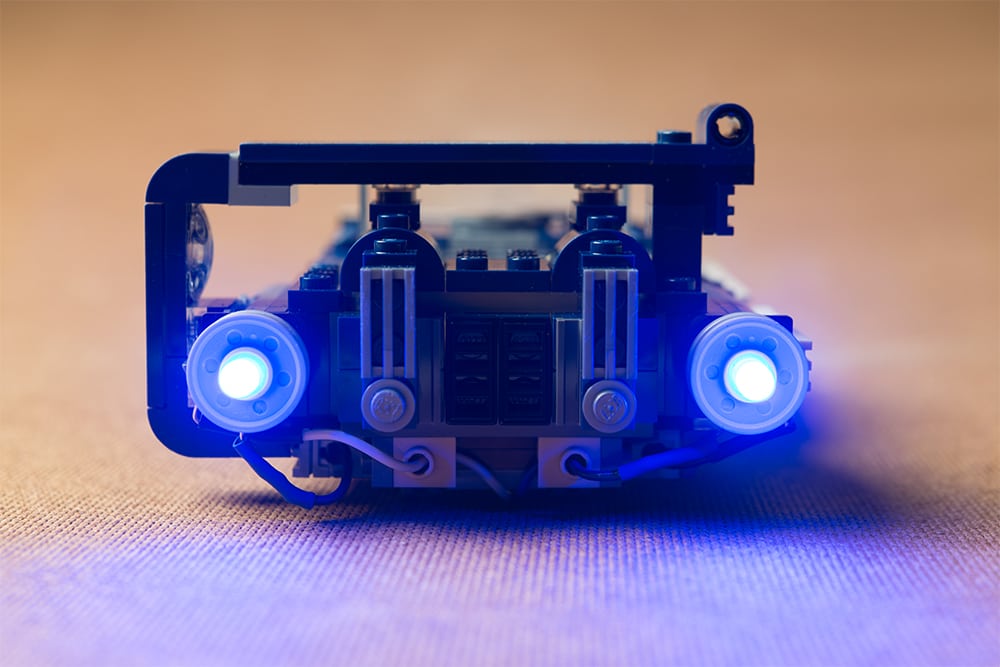
The rear of the landspeeder includes two wheels in place of the boosters. I also noticed there was a wheel in the front, ideal for a headlight. That’s when the idea for LEDs popped into my head. Lights could be used to add to both the aesthetics and functionality of the speeder. Each wheel has room for an LED and, using a drill, I was able to make small holes for the leads. Getting the leads into these holes took some patience, but the LEDs fit well in the end.
Before putting the boosters back on the speeder, I needed to make room for wires, sensors and a microcontroller. For the brain of the speeder I wanted something small and easy to program. The blue and white LEDs I utilized operate at around three volts; this made the 3.3V Arduino Pro Mini perfect for this project. I also wanted a sensor to actuate the LEDs.
Seeing as this is a landspeeder, I thought it would be fitting if the LEDs turned on when you set the speeder down and turned off when you picked it up. To do this I used a time-of-flight range finder sensor, which detected the distance between the speeder bed and any object below it.
Once I had my hardware, I needed to find a place to store it. I wanted the electronics to be as hidden as possible, so I took what I learned from the initial build and hollowed out the front end of the speeder, which was not vital to the overall structure of the set.
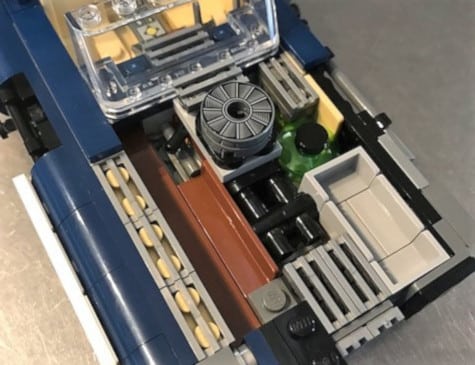
This front compartment will have room to fit both the Pro Mini and a battery to power the whole circuit. There was still no room in this space for the range finder sensor, so I had to make space on the bottom of the speeder.
After redesigning the base of the set, I topped it off by drilling a large hole to bridge the undercarriage and the front compartment. This allows for wires from the LEDs and range finder to reach the Pro Mini without needing to wrap completely around the speeder.
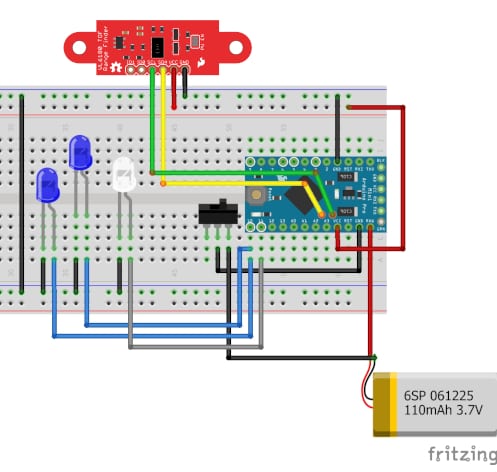
The next step was to make sure I got the circuit working. I grabbed a breadboard, some jumper wires, a switch, LEDs, the range finder and the Pro Mini, and got to work. The two blue LEDs, connected to the boosters, share one digital pin, as they will be lit at the same time. The white LED, acting as the headlight, will be connected to a separate digital pin. The range finder will communicate using I2C, meaning the sensor will require four connections: ground, power, SDA and SCL.
After completing the circuit and checking connections, I uploaded some simple code to insure the LEDs were all working.
If you plan on trying this project yourself, check your circuit using a multimeter. You should be close to 3V and under 20mA through all three LEDs.
As I continued developing more detailed code, I thought back to my original inspiration. Simply turning the LEDs on didn’t seem exciting enough. There is a risk involved, an uncertainty in the movie. I decided to program the booster lights to flicker at start-up a random number of times for a random duration, then fade from darkness to full brightness as the speeder comes to life. I then added the headlight sparking to full brightness, as to illuminate the darkened streets of Corellia.
To bring the risk to the next level, I programmed the ignition to, at random, fail at start-up. In this case the boosters will still flicker but they will instead fade to darkness and the headlight will brighten for less than a second before also shutting off. In the end, my code looked like this:
//Solo Speeder
//Author: Jackson Hootman
//SparkFun Electronics
//July 20, 2018
//Arduino 1.8.5
//Arduino Pro Mini 3.3V 8 MHz
//required libraries to use range finder
#include <Wire.h>
#include <SparkFun_VL6180X.h>
//pin definitions
#define blue 10
#define white 11
//distance triggers (in mm)
#define distLlim 20
#define distUlim 35
//I2C address of range finder
#define VL6180X_ADDRESS 0x29
//Initialize range finder
VL6180xIdentification identification;
VL6180x sensor(VL6180X_ADDRESS);
//variable for storing distance from speeder bed to ground
int dist;
//values for which startup will fail
int loser[6];
//value of startup
int event;
//is the speeder grounded?
boolean grounded = false;
void setup() {
//Start Serial at 115200bps
Serial.begin(115200);
//Start I2C library
Wire.begin();
//LEDs to output
pinMode(blue, OUTPUT);
pinMode(white, OUTPUT);
delay(100);
//Initialize device and check for errors
if (sensor.VL6180xInit() != 0) {
Serial.println(“FAILED TO INITALIZE”);
};
//Load default settings to get started
sensor.VL6180xDefautSettings();
delay(1000);
}
void loop() {
//find distance to ground
dist = sensor.getDistance();
//print distance
Serial.print(“Distance measured (mm) = “);
Serial.println( dist );
Serial.println();
//if put on the ground
if (dist < distLlim && grounded == false) {
Serial.println(“Attempting ignition…”);
//attempt ignition with a number of flickers between 1 and 20
ignition(random(1, 20));
//if successful
if (caseGen()) {
Serial.println(“Engines stable”);
//Boosters fade to bright
for (int m = 0; m <= 255; m += 5) {
analogWrite(blue, m);
delay(50);
}
//all lights on
digitalWrite(blue, HIGH);
headlight();
digitalWrite(white, HIGH);
//speeder grounded
grounded = true;
Serial.println();
} else {
//if not successful, turn lights off
Serial.println(“Engines failure”);
for (int n = 255; n >= 0; n -= 5) {
analogWrite(blue, n);
delay(50);
}
digitalWrite(blue, LOW);
headlight();
digitalWrite(white, LOW);
grounded = true;
Serial.println();
}
}
// if lifted off the ground, turn LEDs off
if (dist > distUlim && grounded == true) {
Serial.println(“Deactivated”);
powerDown();
//grounded now false
grounded = false;
Serial.println();
}
delay(500);
}
void ignition(int delays) { //Ignite booster engines
//array holdeing 3 different delay lengths
int delaylen[3];
//assigning random delay lengths
for (int j = 0; j <= 2; j++) {
delaylen[j] = random(10, 50 * j + 25);
}
//boosters flickering
for (int i = 1; i <= delays; i++) {
digitalWrite(blue, HIGH);
delay(delaylen[random(0, 2)]);
digitalWrite(blue, LOW);
delay(delaylen[random(0, 2)]);
}
}
boolean caseGen() { //Generate random result
//is ignition successful
boolean result;
//assigning values of startup failure
for (int k = 0; k <= 5; k++) {
loser[k] = random(1, 10);
}
//event will be randomized at an integer between 1 and 10
event = random(1, 10);
// if event integer is equal to 1 of the integers in the loser array, ignition will fail
if (event == loser[0] || event == loser[1] || event == loser[2] || event == loser[3] || event == loser[4] || event == loser[5]) {
Serial.println(“Ignition failed… Lady Proxima is on your tail!”);
result = false;
} else {
Serial.println(“Ignition success… I’ve got a really good feeling about this”);
result = true;
}
return result;
}
void headlight() { //Flicker headlight
digitalWrite(white, HIGH);
delay(100);
digitalWrite(white, LOW);
delay(100);
}
void powerDown() { //Turn lights off
for (int p = 255; p >= 0; p -= 5) {
analogWrite(blue, p);
analogWrite(white, p);
digitalWrite(blue, LOW);
digitalWrite(white, LOW);
}
}
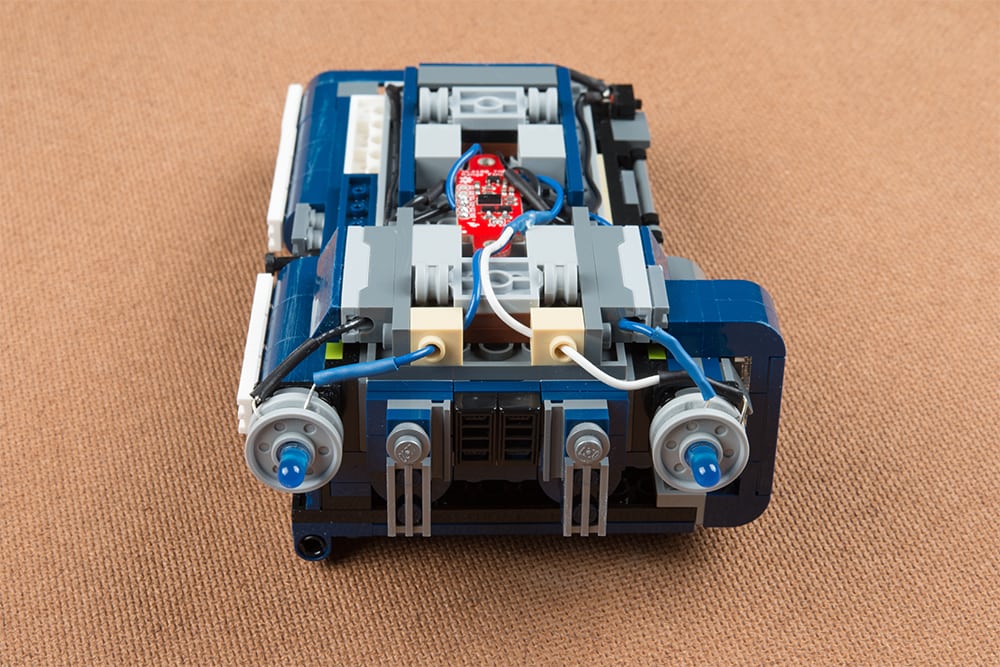
With the code completed, the next step was to mount the sensor, microcontroller, switch, boosters and headlight to the speeder. I used hot glue to attach the switch, range finder and the Pro Mini to detachable bricks. This way, the components won’t be permanently fixed to the base plate of the set. I used 22-gauge wire to make all the electrical connections in this project. In cases where I needed to solder wire to an LED lead, I covered the solder joint with heat shrink wrapping.
I chose wire colors that complimented the color scheme of the landspeeder, which largely added to the overall look of the set. The key here is to be subtle with your wiring. You don’t want it to overpower everything else. At the same time though, you want the wires to be evident. They give the speeder a futuristic look authentic to the Star Wars universe. Adjusting everything to fit was a bit of a puzzle, but like the entirety of this project, I enjoyed the creative problem solving it took to get the job done.

The most difficult process during the speeder’s construction was taking the working circuit and transferring the wiring and components to a less user-friendly environment. The soldering was slow and the placement of parts was delicate but above all, it was exciting seeing an idea of mine come to life. Taking a thought and making it real, in the end, was the whole purpose of this project: to try something, to have an idea and pursue it.
So for anyone reading, I challenge you to embrace your nerdiness, to pursue the absurd, and to try something new. Take something you’re passionate about and make it better. Take an idea and make something completely new. Don’t let a fear of failure slow you down, let curiousity guide you, and learn about something that’s fascinating to you.
I already have countless ideas to build on this project, and even more ideas for new and bigger projects. It seems as though, at least in my case, the biggest step was getting started. Once I took that fist step, I was able to step away from the style of learning I had adopted in school. I experimented because I was curious, I took the time because I was invested and I tried because I had an idea and I wanted to see it become reality.
So good luck out there, makers! I hope you find a project that makes you as excited as Han Solo is about making the Kessel Run in 12 parsecs.